


As many ASP.NET developers abandon classic ASP.NET Forms for ASP.NET MVC, Microsoft continues to improve the functionality of the ASP.NET Forms architecture. For example, ASP.NET 4.0 introduced the ClientIDMode attribute to all web controls, giving us much more control over the naming conventions followed by auto-generated HTML elements. This made it easier to access the tags from JavaScript and CSS.
Another benefit is that as much greater support for HTML5/CSS3/JavaScript has been added to Visual Studio and the .NET framework for MVC, the Web Forms architecture has also benefitted.
Strongly-typed web data controls are another improvement introduced with ASP.NET 4.5.They offer great IntelliSense (visual auto-completion) in the ASPX Visual Studio designer when working with the templates that prevent typing errors. Along with IntelliSense, they support one-way and two-way data binding.
Assume we have a class that represents sales people called SalesPerson.
public class SalesPerson
{
  public string SalesPersonID { get; set; }
  public string     FirstName { get; set; }
  public string      LastName { get; set; }
}
So long as it is accessible to the Web page, we can refer to this class directly on the web data control. Specifically, we will set its ItemType property to the name of the class, SalesPerson. Remember that you may need to use an Import directive at the top of the .aspx page.
Note the IntelliSense that appears when just setting the ItemType property of this GridView control.

Setting ItemType on data control
Once the ItemType has been set on the Web data control, all public properties of the class are available in the templates.
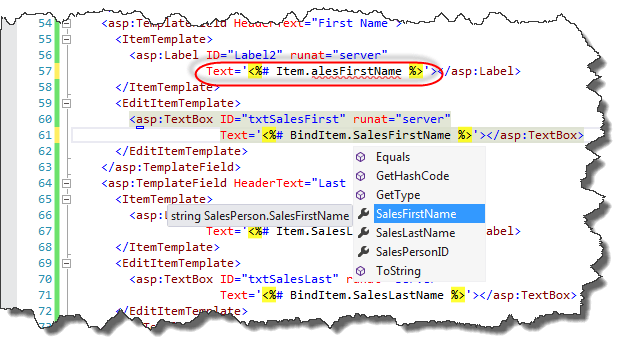
Use the Item object for one-way data binding.
Use the BindItem object for two-way data binding.
The picture below shows that Visual Studio is warning us with a red squiggly line about the typo in the SalesFirstName property.
IMPORTANT: Strongly-typed data binding requires that the data source return it in a strongly-typed collection of objects.
The SqlDataSource returns a weakly-typed collection. You can assign your custom methods to the Web data control’s CRUD method properties, such as SelectMethod, UpdateMethod, and so on. Alternately, you can simply use an ObjectDataSource control with the four CRUD methods assigned to methods within your custom data access layer (DAL) type.
The GridView control has been modified to no longer use SqlDataSource and has methods assigned to the SelectMethod and UpdateMethod properties.
Here is the C# code that uses a static list of sales people to simulate accessing the database:
// Static list of the sales team.
public static List<SalesPerson> salesFolks = new List<SalesPerson>()
  {
    new SalesPerson()
      {SalesPersonID="1", SalesFirstName="Hank", SalesLastName="Ketchup" },
    new SalesPerson()
      {SalesPersonID="2", SalesFirstName="Tom", SalesLastName="Thumb" },
    new SalesPerson()
      {SalesPersonID="2", SalesFirstName="Sally", SalesLastName="Mae" },
    new SalesPerson()
      {SalesPersonID="2", SalesFirstName="Shirley", SalesLastName="Jest" },
    new SalesPerson()
      {SalesPersonID="3", SalesFirstName="Runny", SalesLastName="Babbit" }
  };

  public IEnumerable<SalesPerson> GetSalesFolks()
  {  return salesFolks;  }

  public void UpdateSalesPerson(SalesPerson updatedSP)
  {
    SalesPerson foundSP =
      salesFolks.Find(s => s.SalesPersonID == updatedSP.SalesPersonID);
    foundSP.SalesFirstName = updatedSP.SalesFirstName;
    foundSP.SalesLastName = updatedSP.SalesLastName;
  }
Here is the markup of the GridView control that uses it:
<asp:GridView ID="GridView1" runat="server"
              AutoGenerateColumns="false"
              DataKeyNames="SalesPersonID"
              SelectMethod="GetSalesFolks"
              UpdateMethod="UpdateSalesPerson"
              ItemType="SalesPerson">
  <Columns>
    <asp:TemplateField HeaderText="SalesPerson ID">
      <ItemTemplate>
        <asp:Label ID="Label1" runat="server"
                   Text='<%# Item.SalesPersonID %>'></asp:Label>
      </ItemTemplate>
      <EditItemTemplate>
        <asp:Label ID="Label4" runat="server"
                   Text='<%# Item.SalesPersonID %>'></asp:Label>
      </EditItemTemplate>
    </asp:TemplateField>
    <asp:TemplateField HeaderText="First Name">
      <ItemTemplate>
        <asp:Label ID="Label2" runat="server"
                   Text='<%# Item.SalesFirstName %>'></asp:Label>
      </ItemTemplate>
      <EditItemTemplate>
        <asp:TextBox ID="txtSalesFirst" runat="server"
                     Text='<%# BindItem.SalesFirstName %>'></asp:TextBox>
      </EditItemTemplate>
    </asp:TemplateField>
    <asp:TemplateField HeaderText="Last Name">
      <ItemTemplate>
        <asp:Label ID="Label3" runat="server"
                   Text='<%# Item.SalesLastName %>'></asp:Label>
      </ItemTemplate>
      <EditItemTemplate>
        <asp:TextBox ID="txtSalesLast" runat="server"
                     Text='<%# BindItem.SalesLastName %>'></asp:TextBox>
      </EditItemTemplate>
    </asp:TemplateField>
    <asp:TemplateField HeaderText="Tweak SalesPerson...">
      <ItemTemplate>
        <asp:Button ID="btnEdit" runat="server" CommandName="Edit"
                    Text="Edit This Salesperson" />
      </ItemTemplate>
      <EditItemTemplate>
        <asp:Button ID="btnUpdate" runat="server" CommandName="Update"
                    Text="Update Salesperson" />
        <asp:Button ID="btnCancel" runat="server" CommandName="Cancel"
                    Text="Cancel Update" />
      </EditItemTemplate>
    </asp:TemplateField>
  </Columns></asp:GridView>
Best wishes, Forms developers. Microsoft hasn’t abandoned you!


In this code:
public void UpdateSalesPerson(SalesPerson updatedSP)
{
SalesPerson foundSP =
salesFolks.Find(s => s.SalesPersonID == updatedSP.SalesPersonID);
foundSP.SalesFirstName = updatedSP.SalesFirstName;
foundSP.SalesLastName = updatedSP.SalesLastName;
}
a) Don’t you need some kind of save call Like ‘foundSP.Save()’ ?
b) Is there any way to avoid the left-hand = right-hand coding?
e.g. foundSP.SalesFirstName = updatedSP.SalesFirstName;
isn’t there some instantiated object you can just call save on? Like in the select method, you don’t need to do the left hand right hand thing.
How to bind dropdownlist with foreign key