


NgRx Tutorial: Add Router Info to State

Adding Angular router information to state is very important for NgRx. Why, though, does it matter if the Url, parameters and query parameters are stored in state? Good question! This post aims to answer the question. I’ll be building upon the code that has been written in my previous four posts on NgRx. I plan to add a starship detail page to the app which features the Star Wars API.
The code is on github.
Before we jump in, here are other NgRx tutorials I’ve written:
- NgRx Tutorial: Quickly Adding NgRx to Your Angular 6 Project
- NgRx Tutorial: Actions, Reducers and Effects
- NgRx Tutorial: Accessing State
- NgRx Tutorial: Add State to Feature Module
Add Custom Router Serializer
The first thing I’ll do is get the router information into state. There is some pretty boilerplate code that we’ll add to our root reducer to make that happen. You can find it in the NgRx docs here. Note that the code there isn’t perfect and I’ll point that out as we go.
In our app/store/reducers/index.ts file, let’s add this code:
export interface RouterStateUrl {
  url: string;
  params: Params;
  queryParams: Params;
}

@Injectable()
export class CustomSerializer implements RouterStateSerializer<RouterStateUrl> {
  serialize(routerState: RouterStateSnapshot): RouterStateUrl {
    let route = routerState.root;

    while (route.firstChild) {
      route = route.firstChild;
    }

    const {
      url,
      root: { queryParams }
    } = routerState;
    const { params } = route;

    // Only return an object including the URL, params and query params
    // instead of the entire snapshot
    return { url, params, queryParams };
  }
}
- RouterStateUrl is an interface which defines what we want to store about the router
- It can be anything that is on RouterStateSnapshot (however, there are some things on RouterStateSnapshot that are not immutable and will break NgRx store freeze)
- The CustomSerializer class will basically be the code that copies things from the RouterStateSnapshot into our RouterStateUrl interface and returns that
- To get this code to run, you’ll have to add the following code to the app.module:
  imports: [
    <snip>
    StoreRouterConnectingModule
  ],
  providers: [{ provide: RouterStateSerializer, useClass: CustomSerializer }],
- Import the StoreRouterConnectingModule
- Note that this is where the NgRx docs’ code has it wrong (at least as of 9/9/2018) – there is no need for the forRoot({serializer: RouterStateSerializer}) – in fact it won’t compile if you have it
- Provide the RouterStateSerializer to be our CustomSerializer
Add the Router Info to State
Now that the CustomSerializer is in place, we are ready to add it to state. Back in the app/store/reducers/index.ts file, we’ll add a new ‘router’ property to State and reducers:
import {
  StoreRouterConnectingModule,
  routerReducer,
  RouterReducerState,
  RouterStateSerializer
} from "@ngrx/router-store";

export interface State {
  auth: fromAuth.State;
  router: RouterReducerState<RouterStateUrl>;
}

export const reducers: ActionReducerMap<State> = {
  auth: fromAuth.reducer,
  router: routerReducer
};
- Add the “router” property to the State interface
- RouterReducerState is imported from @ngrx/router-store
- The generic piece here is our RouterStateUrl interface defined previously
- Add the “router” property to the ActionReducerMap
- routerReducer is imported from @ngrx/router-store
Add Router Info Selectors
Lastly, I’m going to add selectors so we can access this router info in our application. Without this piece, at this point, we would still have a win by putting router info in the state because it gives us the ability to do time-traveling using the Redux DevTools in Chrome. I’ll show you this later on.
Here are the selectors in the app/store/reducers/index.ts file:
// Reducer selectors
export const selectReducerState = createFeatureSelector<
  RouterReducerState<RouterStateUrl>
>("router");

export const getRouterInfo = createSelector(
  selectReducerState,
  state => state.state
);
- selectReducerState creates our feature selector “router” which matches the property name on State and the reducers map
- getRouterInfo returns the RouterStateUrl interface we defined initially with the url, params and queryParams – which is what we care most about
And that’s all there is to getting router information into state for our application. Be patient on this, it seems like there is no reason for this but there is a big payoff for this coming (besides the time-traveling.)
Create a Ship Detail Component
Now that we have the router info stored in state, it’s time to build a component that will use it and get our big payoff that’s been promised.
To create the ship detail component, run this command:
ng generate container starships/ship-detail --state store/reducers/index.ts --stateInterface State
- This created a component with the store injected into the constructor nicely
- It also defined it in the starships module
I’ll add this HTML code:
<h1>Ship Detail</h1>
<div *ngIf="(starShip$ | async) != null">
  <h2>{{(starShip$ | async).name}}</h2>
  <table>
    <tr>
      <td width="20%"><strong>Manufacturer</strong></td>
      <td width="50%">{{(starShip$ | async).manufacturer}}</td>
    </tr>
    <tr>
      <td><strong>Cost In Credits</strong></td>
      <td>{{(starShip$ | async).cost_in_credits}}</td>
    </tr>
    <tr>
      <td><strong>Length</strong></td>
      <td>{{(starShip$ | async).length}}</td>
    </tr>
    <tr>
      <td><strong>Crew</strong></td>
      <td>{{(starShip$ | async).crew}}</td>
    </tr>
    <tr>
      <td><strong>Passengers</strong></td>
      <td>{{(starShip$ | async).passengers}}</td>
    </tr>
    <tr>
      <td><strong>Class</strong></td>
      <td>{{(starShip$ | async).starship_class}}</td>
    </tr>
  </table>
</div>
And the component TypeScript:
import { Component, OnInit } from "@angular/core";
import { Store } from "@ngrx/store";
import { Observable } from "rxjs";

import * as fromStore from "../store/reducers";
import { StarShip } from "../../models/star-ship.model";

@Component({
  selector: "app-ship-detail",
  templateUrl: "./ship-detail.component.html",
  styleUrls: ["./ship-detail.component.css"]
})
export class ShipDetailComponent implements OnInit {
  starShip$: Observable<StarShip>;

  constructor(private store: Store<fromStore.State>) {}

  ngOnInit() {
    this.starShip$ = this.store.select(fromStore.getCurrentShip);
  }
}
This is all there is to the code! It works for any ship that is selected from the list of ships. The magic here is in the fromStore.getCurrentShip selector. Let’s take a closer look at that.
The Starship Selectors
Before looking at the getCurrentShip selector, I have to explain the other one I created: the getAllShipsWithId selector.
export const getAllShipsWithId = createSelector(getAllShips, allShips => {
  if (allShips && allShips.length > 0) {
    allShips.forEach(s => {
      const regex = new RegExp(/.*\/(\d+)\/$/g);
      const match = regex.exec(s.url);
      if (match.length > 1) {
        s.id = +match[1];
      }
    });
  }
  return allShips;
});
Until now, selectors have been pretty boring, but here you can see what else you can do with them
- The first arg in the createSelector function is the “getAllShips” selector – it returns all of the starships in the store
- The second arg “allShips” will take the ships passed in from “getAllShips” and use a regular expression to grab the starship id from the url property on the starship
- This is necessary so that it will be easy to find a starship by its id later
Here is the getCurrentShip selector and our payoff with the router information:
export const getCurrentShip = createSelector(
  getAllShipsWithId,
  fromRoot.getRouterInfo,
  (ships, routerInfo) => {
    if (ships && ships.length > 0 && routerInfo) {
      const id = +routerInfo.params.shipId;
      if (id >= 0) {
        return ships.find(s => s.id === id);
      }
    }

    return null;
  }
);
- Note that this works because the list of ships we get from the Star Wars API has the details in it, so there is no need for another API call
- If your code needs to get more detailed info, you can of course do that in an effect
- The first arg of the createSelector function is the “getAllShipsWithId” selector – so we can easily match the id with the id in the router info
- The second arg is the fromRoot.getRouterInfo selector which gives us the router info
- The third arg takes both of these and finds the ship by id using the routerInfo.params.shipId
- Note that when the shipId changes, this also changes our selector and the component updates!
- So for example, you could have a previous/next set of buttons that allowed you to navigate up and down the list w/o going back to the grid, this code would execute whenever the route was navigated to
- For this shipId parm to make sense, let’s look at the Starships routing module:
- Note that when the shipId changes, this also changes our selector and the component updates!
const starshipRoutes: Routes = [
  { path: "", component: ShipListComponent },
  { path: ":shipId/detail", component: ShipDetailComponent }
];
- :shipId is added to our params object in the RouterStateUrl interface
And we just need a link in our list of starships:
<td style="width:30%"><a routerLink="{{ship.id}}/detail">{{ship.name}}</a></td>
Results
Let’s take a look at how the site looks now. First, the list of starships has changed to add the id (I guess you wouldn’t have to show the id) and a link in the name of the starship:

If I click on the Millennium Falcon, here is our detail page:
URL=/ships/10/detail

Time Traveling
Finally, here is a look at the Redux DevTools after clicking the “stopwatch icon” on the bottom row of buttons:
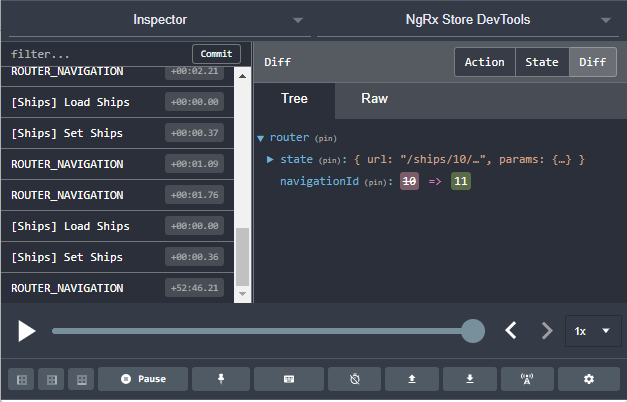
- Notice the ROUTER_NAVIGATION entries – those are added there (partly) so we can travel back in time to see the state at a given point, along with actual navigation happening on the page!
Conclusion
Let’s recap:
- Router information is now stored in state – the single source of truth now for our url, parameters and query parameters
- The parameters can now easily be accessed inside our selectors (or anywhere else for that matter)
- Our component now doesn’t have to have code that gets the id and then retrieves the ship, it is all handled in the selector
- We can do time-traveling using Redux DevTools now
- We have some very clean code
It is my wish that you will take the information you’ve learned in these NgRx tutorials and use them on your job effectively. Happy coding!

